


Editing is a huge part of what makes your style unique and it can really bring a photo to life. Adobe Lightroom is the best tool out there for color grading, some editing and can even help organize your photos. There’s so much you can do with it! You can use it for years and not realize that there are tools you haven’t been taking advantage of! Here are 5 Lightroom tips and tricks that you may not have heard of…
Tip #1: Tips for Organizing Your Photos With Lightroom
Although I recommend using Photo Mechanic for your initial culling, if you still end up with too many images, Lightroom is a great place to refine your selections!
Positive selection is when you flag the photos you like, rather than the ones you don’t like. This can make the process easier, and can help you narrow it down to only the best photos! This way, you’re being more intentional and choosing the images you really love. If you tend to take a ton of photos and have trouble narrowing them down, try using positive selection!
On your keyboard, the numbers 1-5 will assign a star rating to your photo. The numbers 6-9 will give a color outline to the thumbnails. This color outline can give you a visual of which photos you’re keeping once you’re done. (I use the yellow outline to indicate my preview images and the red outline to remind me to pull a photo into Photoshop after editing in Lightroom.) Clicking P will flag an image, and X will reject it. Choose whichever method you like best, and use it to select your photos!
Once you’re done with a gallery, there are ways to organize your photos in Lightroom. Have you ever wanted to write a blog post about a certain place and had to look through endless folders and files to find those photos? To make things easier, you can use the Collections to create sets of photos. For example, you can make one for elopements and one for couples photos or separate your sessions by location, type of scenery, or whatever category you want! Then, add photos from different sessions to these collections as you edit, so that when you need to find them again, it’s much easier.
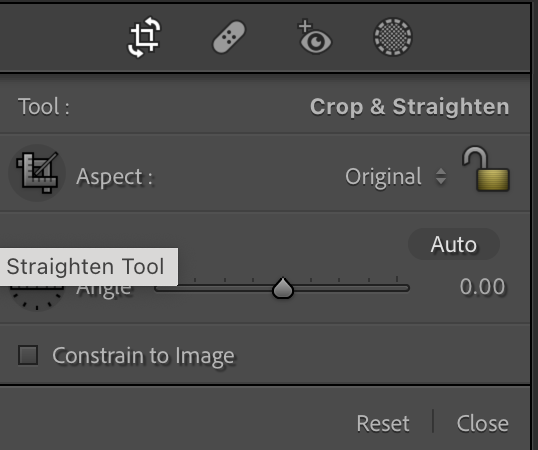
Tip #2: Straightening Horizons in Lightroom
You’re probably familiar with the angle tool in Lightroom – the one that lets you adjust your photo to make sure it’s straight. But did you know there’s an easier way?!
If you click the little ruler on the straighten tool, you’ll be able to click two points on your photo to draw a line. Then, Lightroom will straighten the photo for you! This is amazing for photos with a horizon or any straight line that you can use as a guide.
Tip #3: Changing Colors in Lightroom
You can use the HSL panel to adjust hue, saturation, luminance, altering shades and change the colors in your photo. But, if you need to make a big adjustment, like changing a red jacket to a yellow one, you can do that in Lightroom too.
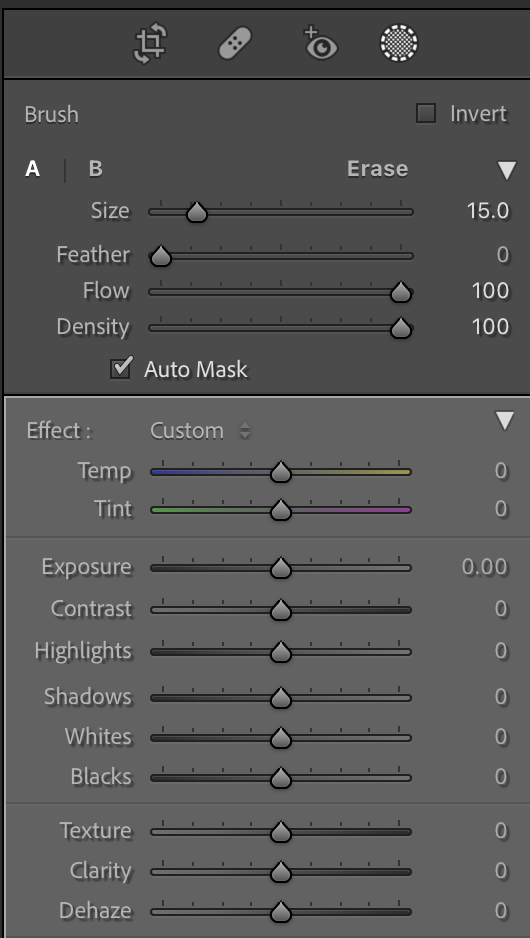
First, select the Adjustment Brush (or press K on your keyboard). Make sure that everything is set to 0 in the panel, and check “Auto Mask” – Lightroom will keep the brush strokes to areas that are the same color. You can paint over the photo with the brush, and cover the area of the object you want to change.
When you have your selection, scroll down a little in the panel – there is a section that says “Color.” Just click the swatch and change it to whatever color you want! The area you selected in your photo will change to that color. Then, you can use the sliders to adjust how it looks, or go back and fine tune it with your brush.
Tip #4: Using Auto Mask in Lightroom
Auto Masking is a pretty new feature that Lightroom released in 2021. It’s an absolute game changer too! Instead of painting over parts of your photo with a brush, you can have Lightroom automatically select your subject.
Just click the mask tool and a toolbar will come up. Click the plus sign and it will give you several options, including “select subject” and “select sky.” You can fine tune it if anything is a little off, but Lightroom does an amazing job selecting. Auto masking will save you so much time! This is helpful when you want your sky to be darker or lighter without affecting the subject. Trust me, this tool can make a huge difference for your photos!
Tip #5: Matching Exposure for All Your Photos in Lightroom
Culling is a pretty time consuming process, but there’s a way to make things easier! The last Lightroom tip is about matching your exposure. When you import your photos, choose one and adjust the exposure. Then, select all of your photos, go to the toolbar at the top, and choose Settings, then Match Total Exposures (or press the Option, up arrow, Command, and M at the same time if you’re on a Mac, Control, Alt, Shift, M on PC). This will match the exposure in all of your photos!
This is super handy when your photos are a little underexposed or overexposed. When you cull, you can use the exposure matching to make all of the images easy to see, instead of changing the exposure one by one. It saves a ton of time! If you were shooting in different lighting conditions (like most weddings), you can also select just a few photos instead of doing all of them. Instead of adjusting each image, you can do a quick edit on one base photo and apply that exposure to a group of photos.
More Tips for Wedding and Elopement Photographers
If you found these Lightroom tips helpful, check out my favorite photography tools! You’ll find more tips on speeding up your workflow. If you have any Lightroom tips and tricks of your own, leave them in a comment below!


be the first to comment